

How To Make A Fade Away Effect In Photoshop
Blend the Paradigm
The adjacent step in creating the poster is to alloy our bass player smoothly from the photo to the black area. You have a few ways to practise this, but allow'southward use a nondestructive method. When erasing parts of an image, the nondestructive method is to use a mask. You lot create a mask on a layer, and and so paint black on the mask to hide the layer contents or paint white to reveal the contents.
Create a Layer Mask
-
 ACA Objective iii.half dozen
Allow's create a mask on the layer containing your paradigm so that you lot tin can fade the image into the black area. And then you'll add some text to the document.
- Click the layer on which you desire to add a mask. In this case, click the layer with the bass player.
-
In the Layers panel, click the Mask button
 .
.The Mask is added to the layer (Effigy iv.12).
A mask displays as a thumbnail to the right of the image thumbnail in the Layers panel.
Because there was no agile selection, the mask is initially all white, thereby revealing the unabridged layer. If a selection is active when you create a mask, the new mask will reveal simply the active selection.
Fade the Image Using a Mask
Now you will fade out the image using the mask. For this chore, you lot will create a slope on the mask that goes from black to white. As the gradient moves from black to white, the image will movement from subconscious to visible.
Gradients in Photoshop can be fairly circuitous, merely let'south start with a uncomplicated preset gradient.
- Select the Gradient tool
 .
. -
Click the layer mask thumbnail to activate the mask.
When the layer mask is active, white corners display around the thumbnail of the mask, but non the layer (Effigy 4.13).
-
In the Options bar, select the gradient that is white to black (Effigy 4.xiv). If the first option in the slope selector is non white to black, printing the D key to return to the default colors.
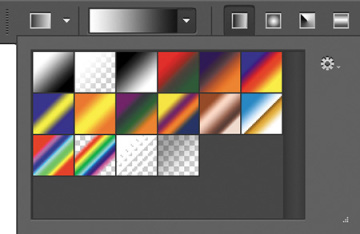
Figure iv.fourteen The preset white to black gradient selected in the Options bar
-
Drag a slope on your image to fade the image from visible to hidden. Yous tin Shift-drag to constrain the gradient's angle, dragging from the arm to the image edge.
The image should fade from visible to transparent, fading away into the black background layer.
-
Save your work by pressing Ctrl+Due south (Windows) or Command+S (Mac Bone).
This effect gives a squeamish transition to your image rather than a hard edge, thereby making the paradigm experience less separated from the residuum of the document and providing a lilliputian more freedom for the text.
Source: https://www.adobepress.com/articles/article.asp?p=2480887&seqNum=4
Posted by: morganlaire1973.blogspot.com
0 Response to "How To Make A Fade Away Effect In Photoshop"
Post a Comment